Showing posts with label Silver Leaf. Show all posts

Tuesday, May 24, 2011

DIY: Silver Leaf Jewelry Cabinet

If I had to choose between a recent favorite project of mine, it would have to be a tie between this project and my newly stenciled wall. Both projects were such a transformation and the end results still have me beaming with satisfaction. That's my kind of high!

Here is how my silver leafed jewelry cabinet turned out. Doesn't it shine like a jewel?


Here is the before. A dark cherry wood stain. Nice, but nothing that would make you stop and take a second look.


How did I accomplish this transformation you ask?

Well here are the details...


Supplies:

 LeFranc 3 hour Size

3 - 25 sheet booklets of aluminum leaf,
that's how many I needed for my project.

Small soft bristle brush

Small foam brush


DIY:


1. First, I printed out this tutorial on how to silver leaf a dresser since I knew nothing about silver leafing something of this size! This is also the same tutorial that inspired me to try my hand at silver leafing.

2. Next, I disassembled the cabinet in the garage and spray painted the the frame and areas that were to be mostly covered silver. No reason to unnecessarily leaf these parts of the cabinet since they were barley exposed.


3. I  then spray painted the hardware silver and let it dry before unscrewing it from the drawers and doors.


4. To adhere the aluminum leaf squares to the cabinet, I applied what is called "size" with a foam brush to the cabinet. It basically acts as a glue that once dried to a "tack", or tacky to the touch, allows you to lay down the silver leaf and adhere it to the piece. I purchased a 3 hour size, not realizing that the "3 hour" part meant that was how long it took the size to become tacky before you can apply the silver leaf. Apply your size in thin strokes. You do not want to apply a thick or goopy coat, if you do, it will only take the size longer to reach "tack".


5. Silver leafing is MESSY! And I highly recommend doing this project in the garage. The aluminum leaf sheets I bought came in a booklet of 25, with a piece of tissue in between each leaf. Very carefully, hold the booklet just above the area you want to apply the leaf, pull out a sheet and lay it down and smooth the leaf out with a soft brush moving the brush in a circular motion. You can also use your fingers to smooth out the leaf. Experiment and see what works best for you. Aluminum leaf is very fragile and WILL break apart. Don't fret! Just lay the broken pieces onto your piece and blend them in with your brush or finger. Also, overlap the sheets just a bit so they blend in better.


This project actually took me two weekends to finish, mostly because I had to wait 3 hours for the size to reach tack, and then because I picked a piece with a TON of drawers and surfaces! But the time and effort was SO WORTH IT!!


I choose to embrace the cracks and "imperfections" in my piece. I think it adds that old vintage feel and gives it character.


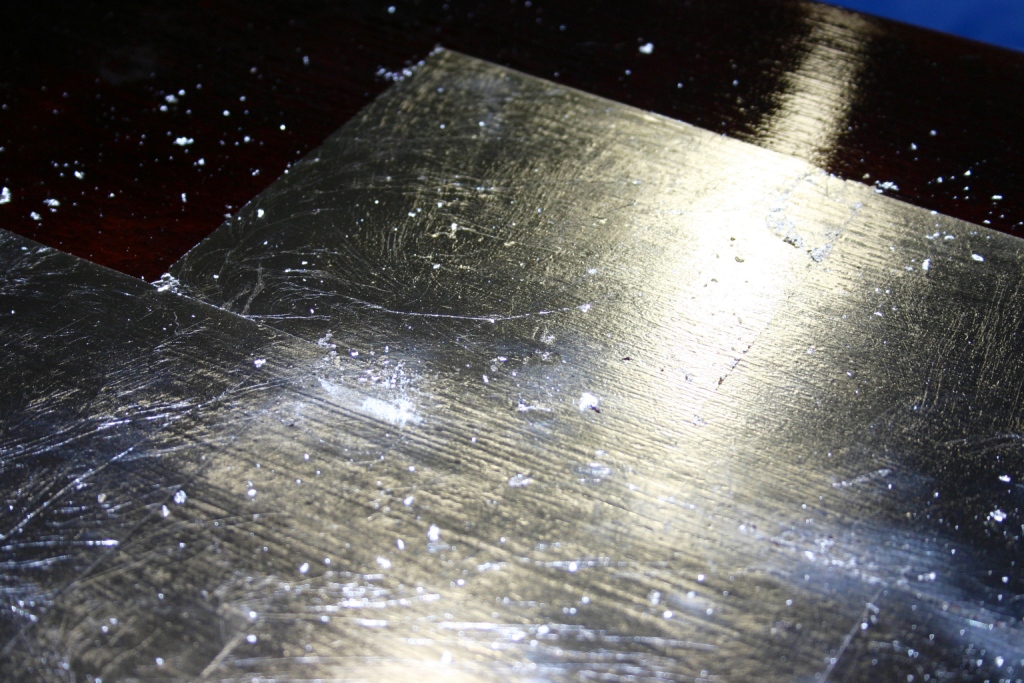
Here's a close-up of the drawers.


And the legs, they turned out the best I think.


A side-by-side comparison. Such a transformation!


Here are a few things I learned during this project...

If you feel the urge to sneeze, sneeze away from the silver leaf!

Imperfections = character. And character is good.

If you are working on a large piece like I was, do not apply size to all the pieces at once. You risk the size loosing it's ideal tack before you can apply the silver leaf to all the pieces. Rather work in chunks.

Clean you brush often by wiping it onto a clean cloth.

It's easiest to rub small pieces of the leaf into cracks with your fingers.

Tackle large jobs over several days. Pace yourself. Remember, it took me two weekends to finish silver leafing my cabinet.

Kneeling on a concrete slab floor is hard on your knees. I finally got smart on day two, and stood the pieces on a table so that I didn't have to kneel over.

Leafing is messy and will get everywhere. But it is also fun!


 Jenny


Wednesday, May 4, 2011

Master Bedroom Reveal

Drum roll please.........

I finally finished making over our bedroom!
I'm not quite sure what piece started the whole domino effect of re-doing our master bedroom. It was probably either my newly silver leaf and shiny jewelry cabinet, or the fabulous over-sized damask stencil that I purchased online. Whichever one it was, it certainly got my creative juices flowing!

I apologize in advance for the overload of photos.

Our bed sits up on a raised platform and through an arch. It feels very dramatic and is my favorite part of our bedroom.

I purchased these canopy spools from Pottery Barn last year. It adds a little drama to our bed. And there's the sunburst mirror I just purchased from Ballard Designs.

 Here's a view of the canopy from the other side. The top spool measures about 1 foot I think. And don't you just dig the damask stencil! I looks like wallpaper, but it's not!

Here's another picture of my stenciled wall. I'm quite proud of how cleanly I carried the stencil all the way to the corners. It looks seamless!

Ahhh, yes....the chartreuse rosette pillows from Target! I couldn't resist them when they went on sale. I think they give the right pop of color in our bedroom.

The ruffle lamp shade was made by moi! I also spray painted our brass looking lamp a fun turquoise.

And this little cutie of a flower pot was another creation of mine. I have a few DIY's to share with you in the coming weeks.

My husband's dresser fits perfectly on the wall behind one of the arches.

I love all things mercury glass! And that flower arrangement, was another creation by moi.

These two frames hang on the wall by my side of the bed. I spray painted the frames from black to gold and then found some pictures online that struck my fancy and printed them onto textured card stock. Voila! Instant art!

Looking out from Jim's side of the bed....

And from my side of the bed (I'm a left side of the bed sleeper)

Signs to fall asleep and rise to: Chase Your Dreams, and Live Laugh Love

I've had these decorative mirrors forever and just love them!

And here is my silver leaf cabinet that I did. Stay tuned for the DIY on that project!

I keep my most favorite earrings out for easy access and display. A girl can never have enough jewels, right?

I have two of these chairs in our bedroom. My grandmother gave them to me. I believe they used to reside in her bedroom. I hand sewed the slipcovers many years ago before I had a sewing machine. I'm pretty proud of the fact that the slipcovers haven't fallen apart!

I created my own "kissing checklist"

#7 on the list was after my husband proposed to me....almost 15 years ago this September. *Correction, we've almost been married 15 years (holy smokes, we're an old married couple!) and he proposed 16 1/2 years ago in November.

My sweet, sweet and ever so thoughtful husband surprised me with this dresser one Christmas shortly after we were married. We had been out looking at antiques and I had spotted this dresser at an Antique mall in Sebastopol, and I commented on how pretty it was. Well he went back and purchased it and then hid it over at his parents house until Christmas. Yep, he's a keeper!

Can you tell I have a thing for flowers? In the spring/summer I like to put fresh flowers out, but during the winter these make a nice substitute.

Here's one last view of our bedroom from just in the doorway. The mirrored door on the left is to our closet. And I will not embarrass myself by posting picture of our closet.

Stay tuned for the details on the following projects from my bedroom make-over....


I almost forgot the Before & After! A make-over isn't complete without a before & after photo....


I'm pretty pleased with how our room turned out, especially the stenciled wall and my silver leaf cabinet. Two things that I have never tried before. So don't be afraid to try something new, you just might surprise yourself!

Jenny


Linked over at The Inspired Room

Related Posts Plugin for WordPress, Blogger...