Showing posts with label Christmas. Show all posts

Sunday, December 11, 2011

A Little Christmas Inspiration

I must apologize for being absent as of late. Today I reached the 37 week mark and I'm definitely feeling it! I'm tired, uncomfortable and just plain slow. To top it all off, last Wednesday my feet and ankles ballooned to about three times their normal size. And Thursday when I went in for my first antenatal appointment (where they monitor the baby's heartbeat), my feet were still swollen and my blood pressure was around 148 laying down. The nurse of course called my doctor pronto and I was ordered straight home to rest for the weekend. Do not pass go-do not collect $200. I go in for another antenatal test on Monday and see my OB on Tuesday, so we will see if I am ordered on home or bed rest for the rest of my pregnancy. Fingers crossed that I am not, because I just might go stir crazy!!
On another note, I hope to post pictures of our home decked out for Christmas soon. I just need to make the house presentable for posting (i.e. clear off kitchen island of all the paper clutter, put away the rest of the shower gifts that have been living on the dining room table, etc.).

And the nursery is almost ready for it's final reveal. The rug and ottoman finally arrived last week!

Until then, here is a little Christmas Inspiration compliments of Pinterest (by the way, if you have an iPhone; which Santa got me for Christmas and let me open early, you MUST download the Pinterest app!)


source

source

source

source

source

source

source

source

Jenny

Wednesday, November 30, 2011

Christmas Bingo Card

Here's a fun Christmas Bingo Card hanging that I created a few years ago.

The bingo card measures 5x7 and came in a kit I had purchased. I dug through my box of treasures to decorate the card, but you can find similar pieces at your local craft store or online. The photo is a favorite of mine. It's a photo of my mom Janet when she was a little girl and it appears that she has put Santa to sleep with her wish list for Christmas.

I punched a hole in each corner of the card and thread silver pipe cleaner through the holes to use as a hanger. And then I embellished the card with buttons, rhinestones, lace, glitter star and rhinestone button....


a pre-made flower, bottle brush Christmas tree, metal Joy word, a metal "tis the season!" label, garland, pom pom fringe, and crepe paper. I also matted the picture onto white card stock and cut a scallop edge with scissors and then outlined the photo with some silver glitter glue.


You can purchase a bingo cards online....

Source
Or also search the internet for Bingo Images or Clip Art. Here is one that I found in my search....


Source

This would make a fun topper for a special someone's Christmas present, or perhaps an ornament for the tree? I have mine hanging on our entertainment center in the family room.

Jenny

Wednesday, November 16, 2011

Christmas Collage

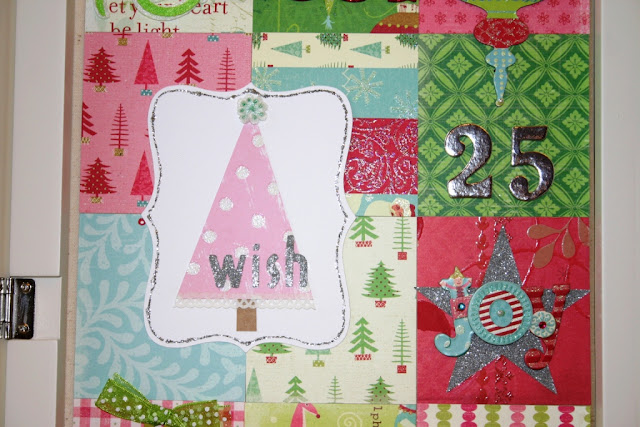
Out of all my seasonal collages, this is probably my favorite. I love that is not your traditional Christmas colors, but rather an array of colorful pinks, greens and blues. I was inspired by a K & Company paper pack and coordinating embellishments.


The top three embellishments were all pre-made. My only touch was a bit of ribbon to the ornament.


The pink Christmas tree I made. The foil 25 was pre-made. I cut the star out of some glitter paper and then added the pre-made JOY on top.


The ornament was pre-made, I just added some ribbon. Be Jolly - I made the white polka dot frame base and then tied the top pre-made piece with ribbon. The felt snowflake is from Stampin Up! and I just embellished it with a glitter oval frame and button. I added a chipboard frame to the pre-made felt flower. And for the Santa, I just added a red frame.


Last up in my collection, my Valentines Collage, which I will feature in February.

Here are my other seasonal collages to date....

Halloween

Fall

Summer

Spring

Home


Jenny


Tuesday, November 8, 2011

DIY Paper Christmas Trees

This is the first in a series of Christmas craft projects I plan to share with you in months of November and December. Christmas is my favorite holiday and as soon as November hits I am inspired to make all things Christmas.

I made these three trees several years ago. I was inspired by a Making Memories ad in Creating Keepsakes magazine. I can't remember which tree it was that Making Memories had featured, it might have been the fringe or loop one, but I knew I had to make my own.  And of course everything is better in threes!


Here's a close-up of the tree trees. The first is a loop version, the middle one a fringe tree, and the last is a collage of torn paper. All three are super easy and fun to make!


Supplies needed:

3 Styrofoam cones
1 wooden dowel cut into 3 pieces
3 pots for your base
3 Styrofoam half balls
 Moss from your floral dept.
3 different kinds of ribbon
Hot glue gun
Glue or adhesive
Scissors
Jingle bells & Pom poms
Decorative ribbon and trim for collage tree, as well as dowels
Assortment of Christmas scrapbook paper


To create the loop Christmas Tree strips:

Cut a 3" x 12" strip of scrapbook paper and fold it in half and secure with adhesive at the top. With scissors, cut strips from the looped bottom, to just about 1/2" from the top.


To create the fringe Christmas tree strips:

 Cut a 2" x 12" strip of scrapbook paper and fold it in half and then in half again. With scissors, cut thin strips to just about 1/2" from the top. Unfold and you now have one long strip of fringe.


To create collage Christmas tree pieces:
(sorry, no picture)

Tear random pieces and strips of scrapbook paper or scraps in various sizes and shapes.


The create the loop and fringe tree:

Starting from the bottom of your styrofoam cone, wrap the tree one strip at a time, securing with adhesive or glue. Trim the strips to length as you work your way up the tree.

To create the collage tree:

Wrap your stryofoam cone in some plain paper and secure with adhesive or glue. Now for the fun part, start gluing and overlapping the torn pieces of paper until you have covered every inch of the cone. Add some trim and ribbon to the bottom of the cone and secure with hot glue or pins.

To assemble your trees:

1. Now take your three pots and place a half styrofoam ball in each.

2. Cover the exposed styrofoam ball with moss using hot glue.

3. Take a dowel and stick it through the center of the sytrofoam ball.

4. Take your tree topper and stick it through the top of the dowel.

5. If either end of the dowel feel loose, secure with hot glue.

6. Wrap each dowel with ribbon and secure with hot glue or adhesive.

7. Add a bell or pom to the top of your trees.

8. Now stand back and admire your craftiness and display your trees for all to see!


Jenny

Tuesday, August 16, 2011

Christmas in August

Hello. My name is Jenny and I am a freak who insists on making handmade Christmas cards every year. You're probably thinking that doesn't sounds that terrible. That is until you hear how many cards I actually make.by.hand.
We're talking in the ballpark of 150+ cards.
Go ahead, call me a freak. I have earned that name.

It all started innocently back in 2003. I thought to myself, "I'll make my own Christmas cards this year. Won't that be fun and save me a TON of $$". Flash forward to 2011 and I am still making my own Christmas cards, because I can't seem to stop. And I'm afraid if I sent out store bought cards, everyone on my Christmas list would call me a fake, or worse. 

Why is the number of cards I make so high, you ask? Well, because my husband is a fire captain, and every year we receive cards from almost everyone in the fire department. So it's really all my husband's fault.

And because I need to make 150+ cards, I have to get started on them in the Summer, when most people haven't even begun to think about Christmas.

Anyways, I came up with my design for our Christmas card this weekend. One for family and friends, which is a little more detailed. And then one for the fire department, which is a little easier to mass produce. I have to confess that they both are SUPER CUTE! But I can't show them to you yet, because I don't want to ruin the surprise in case anyone on my Christmas card list also reads my blog. So instead I will show you a few of my cards from Christmases past.

The card that started it all. The base and photo were computer generated.

2003 Family & Friend Card. The snowman was made from a technique called quilling.

The snowman was stamped and the glitter square frame was heat embossed. The Joy was a die-cut.
This card consisted entirely of stamps. A lot of stamping went into this card!

The snowman was stamped and then colored in with markers. The red strip was embossed.

The snow flake and dot border were stamped, as was the Joy. A tiny jewel was placed in the center of the snowflake.

2010 Christmas card. The reindeer, snowflake border and greeting were all stamped. And a bit of red glitter was placed on Rudolph's red nose.

My apologies if this post now has you now thinking about Christmas. In August!

Jenny


Related Posts Plugin for WordPress, Blogger...