Tuesday, May 31, 2011

It Pays To Have Crafty Friends

Last Thursday when I got home from work I checked the mail at the street and found the usual inside our mailbox....catalogs (my favorite kind of mail, especially if it's the latest Pottery Barn or Ballard Designs), junk mail, yet another credit card application, bills, and a small padded envelope from my friend Lou in Oregon. I tossed the rest of the mail on the passenger seat of my car and quickly tore open the package from Lou. Inside wrapped in tissue was the sweetest, tiniest knitted blue sweater and a written note from Lou that read "I heard you were taking in laundry." 

Clothes Line hanging in my Laundry Room

Close-up  of the sweater Lou knitted. Her sister Berta made the red clothes. Two talented and kind sisters!

Now, I had heard from my friend Berta that her sister Lou reads my blog, although I had no real hard proof of this, since Lou has never left a comment.  

Which, by the way if you are reading this post, or ever like to read my blog but are unsure about leaving a comment, don't be shy! I EAT YOUR COMMENTS UP! Seriously, nothing makes me happier than to see that someone took the time to a) read my little blog and b) left a comment. 

Now back to Lou....her little package proved that she must have seen my post about my Laundry Room Redo. And not only did she read my post, she took the time to knit (although I have not confirmed that she did in fact knit this little sweater, I would bet my life on it, because the woman is a knitting fiend!) a blue sweater for the little clothes line in my laundry room, and almost identical in color to my newly painted laundry room!

Who does that?? A kind, thoughtful and dear friend, that's who! 
 It pays to have crafty friends!

So if you are reading this, Lou, THANK YOU. And don't be shy, leave a comment :)


Jenny


Words for Monday

spotted here

Happy belated Monday :)

Jenny

Friday, May 27, 2011

Etsy Finds 5.27.11


1. J+P Pillow - cute idea for a pillow.
2. Little Bow Necklace - I love how delicate and simple this necklace is. 
3. Summer Poncho - I love the light, airy and transparent look of this poncho.
4. Oversized Bag - This would probably be a back killer, but it looks cool! And think of all the stuff it would hold!
5. Hoop Earrings - I'm a sucker for hoops. Love the beading on these.
6. Winning - This one just made me laugh! Thank you Charlie Sheen. 


Happy Friday and Three Day Weekend!!
I have a few projects around the house that I want to tackle....like paint the family room, clean the guest bedroom of clutter, clean my craft room (I'm about half way done already), help my mom power wash her deck free of winter mold and yuck, and hopefully catch the new Hangover 2 movie in there somewhere! 

Jenny

Thursday, May 26, 2011

Summery Card

This card was fun to make. It reminds me of summer. I've had this stamp set for awhile and finally got around to using it. The stamp set is Dream Big (Close To My Heart) and has over 36 fun little images.

This was a quick and easy card to make. I just punched some circles out of my scrap paper stash. Stamped various images in different inks. Used my favorite scallop punch on the edge of my card and added a thin strip of red paper to draw your eye to the scallops. Done in under 10 minutes!

I will definitely be using this stamp set more often!


Jenny

Tuesday, May 24, 2011

DIY: Silver Leaf Jewelry Cabinet

If I had to choose between a recent favorite project of mine, it would have to be a tie between this project and my newly stenciled wall. Both projects were such a transformation and the end results still have me beaming with satisfaction. That's my kind of high!

Here is how my silver leafed jewelry cabinet turned out. Doesn't it shine like a jewel?


Here is the before. A dark cherry wood stain. Nice, but nothing that would make you stop and take a second look.


How did I accomplish this transformation you ask?

Well here are the details...


Supplies:

 LeFranc 3 hour Size

3 - 25 sheet booklets of aluminum leaf,
that's how many I needed for my project.

Small soft bristle brush

Small foam brush


DIY:


1. First, I printed out this tutorial on how to silver leaf a dresser since I knew nothing about silver leafing something of this size! This is also the same tutorial that inspired me to try my hand at silver leafing.

2. Next, I disassembled the cabinet in the garage and spray painted the the frame and areas that were to be mostly covered silver. No reason to unnecessarily leaf these parts of the cabinet since they were barley exposed.


3. I  then spray painted the hardware silver and let it dry before unscrewing it from the drawers and doors.


4. To adhere the aluminum leaf squares to the cabinet, I applied what is called "size" with a foam brush to the cabinet. It basically acts as a glue that once dried to a "tack", or tacky to the touch, allows you to lay down the silver leaf and adhere it to the piece. I purchased a 3 hour size, not realizing that the "3 hour" part meant that was how long it took the size to become tacky before you can apply the silver leaf. Apply your size in thin strokes. You do not want to apply a thick or goopy coat, if you do, it will only take the size longer to reach "tack".


5. Silver leafing is MESSY! And I highly recommend doing this project in the garage. The aluminum leaf sheets I bought came in a booklet of 25, with a piece of tissue in between each leaf. Very carefully, hold the booklet just above the area you want to apply the leaf, pull out a sheet and lay it down and smooth the leaf out with a soft brush moving the brush in a circular motion. You can also use your fingers to smooth out the leaf. Experiment and see what works best for you. Aluminum leaf is very fragile and WILL break apart. Don't fret! Just lay the broken pieces onto your piece and blend them in with your brush or finger. Also, overlap the sheets just a bit so they blend in better.


This project actually took me two weekends to finish, mostly because I had to wait 3 hours for the size to reach tack, and then because I picked a piece with a TON of drawers and surfaces! But the time and effort was SO WORTH IT!!


I choose to embrace the cracks and "imperfections" in my piece. I think it adds that old vintage feel and gives it character.


Here's a close-up of the drawers.


And the legs, they turned out the best I think.


A side-by-side comparison. Such a transformation!


Here are a few things I learned during this project...

If you feel the urge to sneeze, sneeze away from the silver leaf!

Imperfections = character. And character is good.

If you are working on a large piece like I was, do not apply size to all the pieces at once. You risk the size loosing it's ideal tack before you can apply the silver leaf to all the pieces. Rather work in chunks.

Clean you brush often by wiping it onto a clean cloth.

It's easiest to rub small pieces of the leaf into cracks with your fingers.

Tackle large jobs over several days. Pace yourself. Remember, it took me two weekends to finish silver leafing my cabinet.

Kneeling on a concrete slab floor is hard on your knees. I finally got smart on day two, and stood the pieces on a table so that I didn't have to kneel over.

Leafing is messy and will get everywhere. But it is also fun!


 Jenny


Friday, May 20, 2011

For the love of Pinterest!

 My usual Friday Etsy Finds is postponed a wee bit. But here's a different post to tie you over....

Have you discovered Pinterest yet? It's like a beautiful photo album for all your favorite online images. See something you like, "pin it" to your Pinterest album. Also pin images from your friends and other members albums. It even saves the link to each image for you so you won't forget where you found it!
It's the bees knees!

Here's a peek at my Pinterest boards. I still have some adding to do, but I'm confident that my boards will be a runneth over in no time ;-)


Want an invitation to join?  Leave a request in the comments, or send me a private email and I will send you an invite. You can sign up on your own, but it takes forever to be accepted it seems! I tried two times to sign up on my own before a friend kindly sent me an invitation to join. Aren't friends great!

Jenny

Wednesday, May 18, 2011

DIY: Ruffled Lampshade

I was thinking about silver leafing our bedroom lamps since I'm now an expert at silver leafing (that DIY to come next week!), but then I thought spray painting them turquoise might be fun. I tend to change my mind A LOT. Just ask my husband. And when I spied Dear Lillie's ruffled lampshade tutorial, I KNEW what I wanted to do with my "blah beige" lampshades.

Didn't my lamp turn out cute!


Here's the before. Nothing really too exciting going on here. I like the shape of the base, but the color doesn't really fit in with my new shabby shic blue walls.


I am going to give you my tutorial, but Dear Lillie's tutorial is 10 times better than mine, so feel free to check her's out after you read mine. I won't be offended, honest ;-)

Supplies:

Fabric of your choosing. I used an old sheet.
Hot glue gun and glue sticks
Sewing machine, OR needle and thread
Tape measure
Scissors
Lamp Shade if you don't already have one


Instructions:

1. Measure the height of your lampshade. Mine was 11" tall.

2. Determine how many rows of ruffles you want. I went with three.

3. Now take the height of your shade and divide it by the rows of ruffles 11 / 3 = 3.66. 3.66 is the width of my ruffles. Why can't mine be an even number??

4. Because your want your ruffles to overlap a bit, add 3/4" to 1" onto the width of each strip. Because my strip is such a difficult number I just rounded it up to 4 3/4".

5. Now cut 3 strips of fabric. Since it's hard to guesstimate the length of your strip ruffled, it's best to cut a longer strip then you think you might need. I was cutting from a king sheet, and cut three trips the width of my king sheet. My bottom ruffle was actually the exact width of my king sheet once ruffled!

6. You can either use your sewing machine to gather your strips of fabric, or be lazy like me and gather your strips with a needle and thread while watching tv on the couch. Yes, folks. Sometimes I am just plain lazy! And I'm okay with that.

7. I gathered one ruffle strip and hot glued it to my lamp shade before ruffling the next strip. I started at the top of the shade and worked my way down.


Top row done! I added a few drops of glue to hold some of the ruffles in place along the top of my shade.


The finished shade! Isn't it too cute for words!!


Before & After. It's like Night & Day!


Now go make over a lamp! It's easy and fun!

Jenny

Sunday, May 15, 2011

Birdcage Card

I made this card the other weekend while at a crop. I made two cards, that way I could keep one and give one away. I gave my mom a copy of this card for Mother's Day. She loved it of course.


The birdcage, eggs and text are from the stamp set Nature Walk (Stampin' Up!),
 The bird inside the cage is from the stamp set Vintage Birdcages (TPC Studio),
The dots on the base of the card are from Boutique Borders (Close To My Heart),
And the frame is the die Top Note (Stampin' Up!).
For a dimensional look, I cut out the eggs and birdcage, and placed them on the card with foam squares.


Here's a close-up  of the birdcage and eggs. I colored in the bird and eggs with Copic markers, but unfortunately did not write down the colors I used. I tied some Waxy Flax around the frame because every card needs ribbon or some sort of fiber ;-)


Here you can kinda see how I popped the birdcage and eggs. I stamped the images on the card, and then stamped them again on some scrap card stock, cut them out, and placed them on the card with foam squares.
I'll share the other cards I made in future posts. And one of these days when I straighten up my craftroom, I will post pictures of my creative space. In fact, by putting that out there in cyberspace, maybe it will help me to clean my room!

Jenny


Friday, May 13, 2011

Etsy Finds


1. Sugary Sweet Wall Frame Collection - love the combo of colors. This would look pretty grouped together on wall with your favorite photos. And with a few cans of spray paint,  you could even make over some frames that you already own.
2. Vintage SEARS Typewriter Rings - fun, hip and cool idea for a ring.
3. Multifloral Fifi Clutch - I love the fabric and want this clutch!
4. Cozy Bean Shawl in Yellow - love the sunny color and flower shape of this shawl. If only I could crochet!
5. Pearls and Peridot necklace -  my birthstone is peridot. And this necklace is lovely!
6. Vintage Bracelet - ooh pretty sparkly bracelet!


Happy Friday! I was supposed to go on a scrapbooking retreat this weekend but have been under the weather the last two days. So it's a weekend at home for me :(

Jenny


Tuesday, May 10, 2011

DIY: Stenciled Wallpaper

When I think of stencils, I tend to think of the folk art kind. You know, hearts and ducks and country. But then one day while blog hopping, I stumbled upon Carmel's beautifully stenciled dining room on her blog Our Fifth House

Isn't her dining room just gorgeous!


I quickly visited Olive Leaf Stencils on Etsy where she bought her stencil, and saw this stencil...


Which got the wheels turning in my head that the wall behind our bed would be perfect for a stencil!

See, this is how my mind works....I see an idea, fall in love, obsess over said idea, until I have to get it out of my system and just do it! This is what my poor husband has to live with every.single.day. Don't feel too sorry for him though, because he lives to give me grief over my OCD (Obsessive Compulsive Decorating). Trust me.

Anyway, my mind wasn't 100% made up on stenciling our bedroom wall, that is until I saw this beauty


It was official. I was head over heels in love with this dramatic, over-sized damask stencil. Add to cart. Done!

Meanwhile...back at the ranch (okay, I don't actually live on a ranch, altho' the field we built our house on used to house cows, so I guess it was a ranch at one time), I had not yet told Jim what my plans were for our bedroom. Instead I hung the above picture on our bedroom wall and waited for him to notice. Aren't I cute ;-)

Okay, now for the tutorial.....
Because I had no idea whatsoever on what I was doing, I searched the internet and lots of blogs for stenciling tips. Kate over at Centsational Girl has a great post on tips for stencils. Some of the tips I used, and some I didn't.

Supplies:
Stencil
Re-positionable Spray Adhesive
Painters Tape
Paint
Paint Tray
Brush or roller (I used a special roller for the metallic paint I bought)
Wet rag for clean-ups
Patience and a free weekend!

Tips:
(these are the ones that worked for me)
1. Find the center of your wall and mark it with a pencil or a piece of painters tape. I started from the center of our bed, even though that wasn't the center of the wall, because our bed is centered in the arches. You want to start from the center of the wall so that your stencil design is evenly painted over the span of the wall. If you start from one corner, the far corner where you end your stencil may look "wonky" and "off". So start from the center.

2. Lightly - Medium spray the back of your stencil with re-positionable spray adhesive. This will help hold your stencil to the wall, which was very important for my oversize stencil - mere tape around the corners would not have been enough. You should be able to paint several stencils before having to reapply more spray adhesive.

3. Now find the center of your wall, and position your stencil center of your mark. Use painters tape to secure the edges and corners of your stencil to the wall, as the spray adhesive is not enough "stick" to hold your stencil in place.


4. Now here is the fun and scary (at first) part! Apply paint to your roller (or brush if you decide to go with a brush) in some paint and roll it over the stencil, filling in all the nooks and crannies. Many people recommend that you roll off some paint onto a paper towel before applying the paint to your stencil to prevent the paint from bleeding under the stencil. But because a) my wall color was light, as was my paint for the stencil, and b) my stencil did not have clean cut lines, I was not concerned with the paint bleeding. In fact, I rolled my roller through the paint several times before applying it to the stencil. NOW, this may or may not work for your stencil, so it might be a good idea to test your stencil and the amount of paint to apply on some cardboard before you commit it to the wall.


5. Allow the paint to dry to the touch before applying your next stencil, since you will be overlapping the stencil over the painted stencil. It might be a good idea to pick a warm day to do this project!


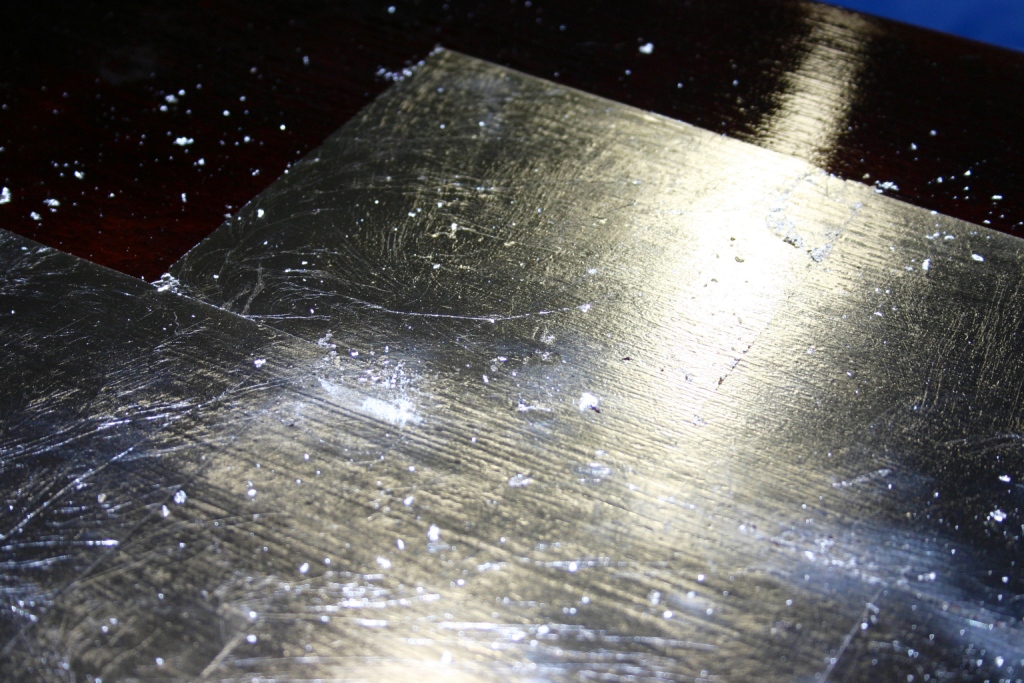
5. The next part is the trickiest part until you get it down, which you will, I promise. You need to line up the stencil with the stencil you already painted. There should be little cut-out markers on the corners and sides of your stencil. I circled the marks on my stencil in yellow so you can see what I'm talking about. The tricky part is figuring our where the cut-outs line up with the painted stencil. I swear this took me a good 5 minutes to figure out, but once I did, the rest were easy-peasy!


6. I painted 4 stencils in a diamond shape, so that I didn't have to wait as long for the paint to dry before applying the next stencil. Once I had 4 stencils painted, I then painted one side, and moved my stencil to the other side, and when I was done painting that side, I usually only had to wait a short while before the other side was dry.


7. The next, and last tricky part, was figuring out how to position the stencil and paint into the corners. This took some experimenting, and a few dropped stencils on my head. What I did was line up my stencil, apply fresh tape to the bottom and sides of the stencil, and hold the stencil in place with one hand while I quickly secured the top half of the stencil to the ceiling or other wall. As you can see in the below picture, the top half of the stencil is not smooth and tight. Don't worry about this. Roll your paint into the bottom half of the stencil and when you are ready to work the paint into the corner of the stencil, with your roller still in place on the stencil, release the top half of the stencil so that it is no longer taped to ceiling, and roll your roller as far into the corner as you can. Clear as mud?


Above the bed is done! I cheated and did not go behind our bed, since our bed will always be in this spot, and there really was no reason for me to make more work for myself. I am all for shortcuts if I can take them!


Here's a picture of how I cut in the stencil on one of the corners. It's near impossible to cut the stencil completely into the corner. The only way I would see being able to cut into the corner, was by cutting my stencil in half, which I was not about to do.


And here's a picture of how I cut it into the baseboard, which you will have to excuse in this picture. This section of the baseboard is normally hidden behind a bedside table.


Almost done!


 Ta Da! Finished. Definitely worth a day and half worth of work! Sorry for the poorly lit picture. Go here to see the after pictures of how the rest of the bedroom turned out.


This project cost me under $100 to do. The most expensive purchase was the stencil at $49. And then the Martha Stewart's Precious Metals paint at around $18.

Stenciling was not as hard as I had imagined it would be. All you need is a free weekend and some patience. It's really easy once you get the first few stencils down. If I can do it, anyone can!

Jenny


Friday, May 6, 2011

Etsy Finds


1. Butterflies Fluttering - I love the dimensional effect of these butterflies. This would look pretty on card, scrapbook page, or even a frame.
2. HOME -I'm all about word art. Just can't get enough of it. I like how they covered the letters with maps.
3. Vintage Corbel - These beautiful corbels make me want to go antique or salvage hunting!These would look so cool on a bookcase or shelf, or even the fireplace mantle.
4. Aqua Sconces -love the color. love the flourish. plain love.
5. Pink Mini Fridge -I have no idea what I would do with this, but it's too darn cute! And it's pink!
6. Open Your Heart Necklace - So simple and delicate. If my husband is reading this, this would make a sweet Valentines or birthday present :)

Happy Friday and Happy early Mother's Day to all the moms out there!

Jenny


Wednesday, May 4, 2011

Master Bedroom Reveal

Drum roll please.........

I finally finished making over our bedroom!
I'm not quite sure what piece started the whole domino effect of re-doing our master bedroom. It was probably either my newly silver leaf and shiny jewelry cabinet, or the fabulous over-sized damask stencil that I purchased online. Whichever one it was, it certainly got my creative juices flowing!

I apologize in advance for the overload of photos.

Our bed sits up on a raised platform and through an arch. It feels very dramatic and is my favorite part of our bedroom.

I purchased these canopy spools from Pottery Barn last year. It adds a little drama to our bed. And there's the sunburst mirror I just purchased from Ballard Designs.

 Here's a view of the canopy from the other side. The top spool measures about 1 foot I think. And don't you just dig the damask stencil! I looks like wallpaper, but it's not!

Here's another picture of my stenciled wall. I'm quite proud of how cleanly I carried the stencil all the way to the corners. It looks seamless!

Ahhh, yes....the chartreuse rosette pillows from Target! I couldn't resist them when they went on sale. I think they give the right pop of color in our bedroom.

The ruffle lamp shade was made by moi! I also spray painted our brass looking lamp a fun turquoise.

And this little cutie of a flower pot was another creation of mine. I have a few DIY's to share with you in the coming weeks.

My husband's dresser fits perfectly on the wall behind one of the arches.

I love all things mercury glass! And that flower arrangement, was another creation by moi.

These two frames hang on the wall by my side of the bed. I spray painted the frames from black to gold and then found some pictures online that struck my fancy and printed them onto textured card stock. Voila! Instant art!

Looking out from Jim's side of the bed....

And from my side of the bed (I'm a left side of the bed sleeper)

Signs to fall asleep and rise to: Chase Your Dreams, and Live Laugh Love

I've had these decorative mirrors forever and just love them!

And here is my silver leaf cabinet that I did. Stay tuned for the DIY on that project!

I keep my most favorite earrings out for easy access and display. A girl can never have enough jewels, right?

I have two of these chairs in our bedroom. My grandmother gave them to me. I believe they used to reside in her bedroom. I hand sewed the slipcovers many years ago before I had a sewing machine. I'm pretty proud of the fact that the slipcovers haven't fallen apart!

I created my own "kissing checklist"

#7 on the list was after my husband proposed to me....almost 15 years ago this September. *Correction, we've almost been married 15 years (holy smokes, we're an old married couple!) and he proposed 16 1/2 years ago in November.

My sweet, sweet and ever so thoughtful husband surprised me with this dresser one Christmas shortly after we were married. We had been out looking at antiques and I had spotted this dresser at an Antique mall in Sebastopol, and I commented on how pretty it was. Well he went back and purchased it and then hid it over at his parents house until Christmas. Yep, he's a keeper!

Can you tell I have a thing for flowers? In the spring/summer I like to put fresh flowers out, but during the winter these make a nice substitute.

Here's one last view of our bedroom from just in the doorway. The mirrored door on the left is to our closet. And I will not embarrass myself by posting picture of our closet.

Stay tuned for the details on the following projects from my bedroom make-over....


I almost forgot the Before & After! A make-over isn't complete without a before & after photo....


I'm pretty pleased with how our room turned out, especially the stenciled wall and my silver leaf cabinet. Two things that I have never tried before. So don't be afraid to try something new, you just might surprise yourself!

Jenny


Linked over at The Inspired Room

Related Posts Plugin for WordPress, Blogger...