Thursday, December 29, 2011

Christmas Came Early!

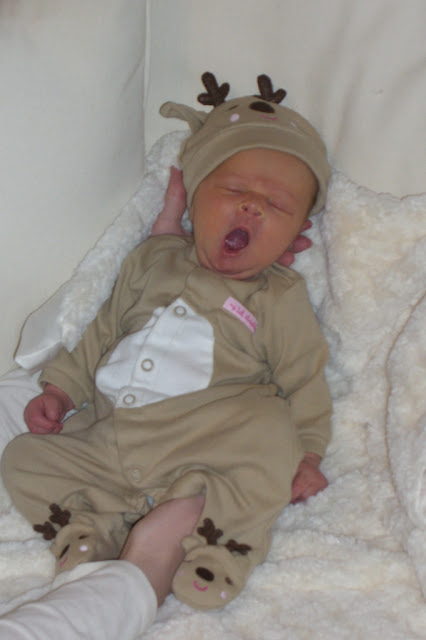
I'm pleased to introduce Isabel Dorothy, 

born December 15th, 5:45 AM, 8lbs 2oz and 20 inches long.

She is the new love in my life and the reason I have been absent from my blog.

I'm pretty sure you won't hold it against me ;-)


Isabel wasn't due until January 2nd, however on December 8th I was diagnosed with preeclampsia, and on December 14th, my doctor decided to induce me at 37w2d since the baby was considered full term. And even though Isabel was early, she was still a big girl! I can only imagine how much she would have weighed if she had gone till her due date. My guess is close to 10lbs.

My husband and I are getting used to being parents and having our world revolve around our little bundle of love. I could stare at her for hours. I know that every mother feels this way, but I think she is the most beautiful baby in the world. She truly takes my breath away.

I have two last projects I hope to get around to soon before I finally post her nursery reveal. I will probably take the next few weeks off from my blog so that I can enjoy being a mommy, and perhaps clean the house which looks like a tornado hit it, but I promise to return, so please check back!

xoxox
Jenny


Sunday, December 11, 2011

A Little Christmas Inspiration

I must apologize for being absent as of late. Today I reached the 37 week mark and I'm definitely feeling it! I'm tired, uncomfortable and just plain slow. To top it all off, last Wednesday my feet and ankles ballooned to about three times their normal size. And Thursday when I went in for my first antenatal appointment (where they monitor the baby's heartbeat), my feet were still swollen and my blood pressure was around 148 laying down. The nurse of course called my doctor pronto and I was ordered straight home to rest for the weekend. Do not pass go-do not collect $200. I go in for another antenatal test on Monday and see my OB on Tuesday, so we will see if I am ordered on home or bed rest for the rest of my pregnancy. Fingers crossed that I am not, because I just might go stir crazy!!
On another note, I hope to post pictures of our home decked out for Christmas soon. I just need to make the house presentable for posting (i.e. clear off kitchen island of all the paper clutter, put away the rest of the shower gifts that have been living on the dining room table, etc.).

And the nursery is almost ready for it's final reveal. The rug and ottoman finally arrived last week!

Until then, here is a little Christmas Inspiration compliments of Pinterest (by the way, if you have an iPhone; which Santa got me for Christmas and let me open early, you MUST download the Pinterest app!)


source

source

source

source

source

source

source

source

Jenny

Wednesday, November 30, 2011

Christmas Bingo Card

Here's a fun Christmas Bingo Card hanging that I created a few years ago.

The bingo card measures 5x7 and came in a kit I had purchased. I dug through my box of treasures to decorate the card, but you can find similar pieces at your local craft store or online. The photo is a favorite of mine. It's a photo of my mom Janet when she was a little girl and it appears that she has put Santa to sleep with her wish list for Christmas.

I punched a hole in each corner of the card and thread silver pipe cleaner through the holes to use as a hanger. And then I embellished the card with buttons, rhinestones, lace, glitter star and rhinestone button....


a pre-made flower, bottle brush Christmas tree, metal Joy word, a metal "tis the season!" label, garland, pom pom fringe, and crepe paper. I also matted the picture onto white card stock and cut a scallop edge with scissors and then outlined the photo with some silver glitter glue.


You can purchase a bingo cards online....

Source
Or also search the internet for Bingo Images or Clip Art. Here is one that I found in my search....


Source

This would make a fun topper for a special someone's Christmas present, or perhaps an ornament for the tree? I have mine hanging on our entertainment center in the family room.

Jenny

Monday, November 28, 2011

41 Reasons...

Today is my dear husband's 41st birthday. I thought I'd honor him with 41 reasons why I think he is the best guy in the world.

1. He has the ability to make me laugh like no one else can. Even when I am trying to be mad at him. Which makes him a very smart man.
2. He's my best friend.
3. He has yet to kick me out of the car for my back seat driving. I don't think I'd be able to put up with myself like he does.
4. He can strike up a conversation with a complete stranger and come way friends. He's that likable of a guy.
5. He's a great cook. So much so that he does the cooking in our house. I know, I'm very spoiled.
6. He treats his mother well. Which I think is very important in a man.
7. He is handy around the house. We did after all build our house.
8. He teases me mercilessly, but I know it's because he has a big ol' crush on me.
9. He loves to surprise me. Not jump out and scare me kind of surprise, but surprise me with a trip to Disneyland like he did for my 27th birthday. 
10. He asks my advice on what shirt to wear with what colored pants or hat. I love that.
 11. He is a walking calculator. He is a math whiz and our financial planner. Math is not my strong point and I am thankful I can leave the numbers up to him and know that our future is well taken care of. 
12. He is a travel bug like me.

13. He is big on tradition like me. Like reliving our first date every year, or exchanging ornaments every Christmas.
14. He knows to get me flowers for my birthday, anniversary and Valentines day. 
15. He's been there for me through some very hard times. I can always count on him to be my rock.
16. When I asked him what first attracted him to me, he told me it was my eyes. Oh be still my beating heart!
17. He's taller and bigger than me. I once dated a guy who was smaller than me and I had a very hard time with it.
18. He's supported me in my new love for running and has run beside me in 5 out of 6 half marathons even though I'm a slower runner.

19. I love how he plays hide and seek with the dogs. It's the cutest thing.
20. He has a green thumb, whereas I have a black one. 
21. He puts up with my obsessive painting and repainting a room until I get the color right. Our poor master bedroom is on it's 5th color.
22. He loves the outdoors as much as I do.
23. He thinks things through, whereas I tend to be impulsive.
24. He has allowed me (although I don't think I really gave him the choice) to turn our "office" into my craft room.
25. He gives the best hugs. Period.
26. He doesn't make fun of me for my fear of heights. In fact, when we were in Italy and climbed up and down countless towers, he would walk in front or behind me so that I would feel safe.
27. When were were first dating, he was away at college at Cal Poly in San Luis Obispo, and we would write each other letters (this was before email) every day. I still have the letters in a box somewhere.
28. He lets me eat the crispy fries.
29. He has a wicked sense of humor.
30. He is kind and thoughtful and not afraid to show his feelings.
31. As a Fire Captain, he risks his life every day he goes to work. He is my hero and I love his bravery.


 32. He can dish it as good as he can take it. We are each others best sparing partner - in a good natured way.
33. He went and saw the fist three Twilight movies with me. I couldn't put him through a fourth one. I'm not that cruel.
34. When I'm sick, he'll make me chicken soup and take care of me.
35. He'll affectionately tell me "You're killing me smalls", after the movie The Sand Lot, when I do something silly. And it always makes me smile.
36. He makes me feel safe.
37. I have never once doubted his love for me nor mine for him. Our love for one another is pure and true.
38. He's super smart. Like encyclopedia smart. If I don't know something, I just ask him.
39. He always asks me what I want to have for dinner, what I want to watch on tv, or where I want to sit in the movie theater. And while sometimes this may get on my nerves because I feel like I am the one always making the decision, I would rather he ask my opinion than not all.
40. He has this twinkle in his eyes that just stops me in my tracks.
41. Kids love him. They eat him up. And I know that he is going to be the most amazing dad.

Happy Birthday Babe!

xoxo,
Jen


Words for Monday

Pinterest

Happy Monday :)

Jenny

Thursday, November 17, 2011

Pregnancy Update

4D Ultrasound taken at 27w2d

My OB sent me in for another 4D ultrasound to have some fibroid tumors checked on. I happen to have 4 of the suckers, but thankfully they have not grown or moved. Before we did IVF, I had surgery to have a large fibroid tumor removed, and my OB decided to leave the smaller fibroids so as not to cut into my uterus too much. Now we just need to watch them and hope they don't obstruct the birth canal. If they do, I'll have to have a c-section,which I'm really hoping to avoid.

Our first 4D ultrasound at around 4 1/2 months produced some freakish pictures. The baby looked more alien than anything. However, our second 4D ultrasound at just under 7 months produced some astonishing pictures (above). We could see her cute button nose, tiny little mouth, precious eyelids, amazing hands. We couldn't get over how detailed the 4D ultrasound was! We just had our third 4D ultrasound today at 33w3d and the pictures weren't as clear as my last ultrasound, probably because the baby has grown and is more crammed inside my tummy. My husband and I were both shocked when the technician told us how big the baby was....6 lbs 10 oz! And I still have 7 weeks to go!! Oh my! And surprise, surprise, she has a full head of hair. She probably gets that from her momma ;-)

The pregnancy is progressing as it should be. I'm growing, although I'm not huge I've been told. However, I feel huge!  Sleeping has become a challenge. I now have to sleep with a pillow between my legs for comfort and find myself tossing and turning A LOT. And bending over to pick something off the floor has become just about impossible and I'm sure hilarious for all who witness me trying too do so. I find myself grunting and groaning when getting up off the couch and out of my car, which my husband loves to tease me about. I'm also tired A LOT, and hungry A LOT. The baby seems to be sucking the energy and food out of me. My plan is to work right up till Christmas and I just hope I have enough energy to do so!

Jenny

P.S. The nursery is coming along. Just need to add some decorative touches here and there. I hope to post pictures of the finished room soon!

Wednesday, November 16, 2011

Christmas Collage

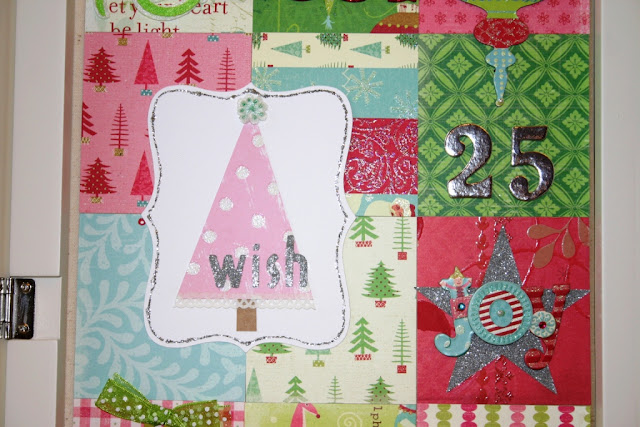
Out of all my seasonal collages, this is probably my favorite. I love that is not your traditional Christmas colors, but rather an array of colorful pinks, greens and blues. I was inspired by a K & Company paper pack and coordinating embellishments.


The top three embellishments were all pre-made. My only touch was a bit of ribbon to the ornament.


The pink Christmas tree I made. The foil 25 was pre-made. I cut the star out of some glitter paper and then added the pre-made JOY on top.


The ornament was pre-made, I just added some ribbon. Be Jolly - I made the white polka dot frame base and then tied the top pre-made piece with ribbon. The felt snowflake is from Stampin Up! and I just embellished it with a glitter oval frame and button. I added a chipboard frame to the pre-made felt flower. And for the Santa, I just added a red frame.


Last up in my collection, my Valentines Collage, which I will feature in February.

Here are my other seasonal collages to date....

Halloween

Fall

Summer

Spring

Home


Jenny


Monday, November 14, 2011

Words for Monday

spotted here

Baby Shower #2 was this last weekend. It was a joint shower. I was worried that none of the men would show up. However, they surprised me and actually got really into the games. Like really into them. It was a fun shower and we are so lucky to have such thoughtful friends.

Shower #3, and the final shower, is this coming Sunday. The shower is being put on by my crafty friends. I can't wait to see what they have in store in the way of decorations :)

Happy Monday!

Jenny

Tuesday, November 8, 2011

DIY Paper Christmas Trees

This is the first in a series of Christmas craft projects I plan to share with you in months of November and December. Christmas is my favorite holiday and as soon as November hits I am inspired to make all things Christmas.

I made these three trees several years ago. I was inspired by a Making Memories ad in Creating Keepsakes magazine. I can't remember which tree it was that Making Memories had featured, it might have been the fringe or loop one, but I knew I had to make my own.  And of course everything is better in threes!


Here's a close-up of the tree trees. The first is a loop version, the middle one a fringe tree, and the last is a collage of torn paper. All three are super easy and fun to make!


Supplies needed:

3 Styrofoam cones
1 wooden dowel cut into 3 pieces
3 pots for your base
3 Styrofoam half balls
 Moss from your floral dept.
3 different kinds of ribbon
Hot glue gun
Glue or adhesive
Scissors
Jingle bells & Pom poms
Decorative ribbon and trim for collage tree, as well as dowels
Assortment of Christmas scrapbook paper


To create the loop Christmas Tree strips:

Cut a 3" x 12" strip of scrapbook paper and fold it in half and secure with adhesive at the top. With scissors, cut strips from the looped bottom, to just about 1/2" from the top.


To create the fringe Christmas tree strips:

 Cut a 2" x 12" strip of scrapbook paper and fold it in half and then in half again. With scissors, cut thin strips to just about 1/2" from the top. Unfold and you now have one long strip of fringe.


To create collage Christmas tree pieces:
(sorry, no picture)

Tear random pieces and strips of scrapbook paper or scraps in various sizes and shapes.


The create the loop and fringe tree:

Starting from the bottom of your styrofoam cone, wrap the tree one strip at a time, securing with adhesive or glue. Trim the strips to length as you work your way up the tree.

To create the collage tree:

Wrap your stryofoam cone in some plain paper and secure with adhesive or glue. Now for the fun part, start gluing and overlapping the torn pieces of paper until you have covered every inch of the cone. Add some trim and ribbon to the bottom of the cone and secure with hot glue or pins.

To assemble your trees:

1. Now take your three pots and place a half styrofoam ball in each.

2. Cover the exposed styrofoam ball with moss using hot glue.

3. Take a dowel and stick it through the center of the sytrofoam ball.

4. Take your tree topper and stick it through the top of the dowel.

5. If either end of the dowel feel loose, secure with hot glue.

6. Wrap each dowel with ribbon and secure with hot glue or adhesive.

7. Add a bell or pom to the top of your trees.

8. Now stand back and admire your craftiness and display your trees for all to see!


Jenny

Monday, November 7, 2011

Words for Monday

Pinterest

My husband's three adorable aunts threw me the most beautiful shower yesterday. I hope to share photos once I get copies.

Happy Monday :)

Jenny

Saturday, November 5, 2011

Halloween Collage

Halloween came and went and I never got around to putting my Halloween decorations out, not even my Halloween collage. This being pregnant thing sure has made me lazy. Well, better late than never, here is my Halloween Collage...


The embellishments were mostly pre-made. The large spider I made using a die-cut machine. The web and 3 spiders were a Jolee's pre-made sticker. The witches hat was also Jolee's and I just placed it on top of a vellum tag and added some ribbon. Happy Halloween was pre-made, I just outlined the frame with some glitter glue.


The first square I wrapped in various Halloween ribbon from Martha Stewart. The moon and crow were both die-cuts, I just outlined the moon with glitter glue (one can never have too much glitter!). The pumpkin was printed on paper, I just framed it with a silver pipe cleaner. I stamped BOO on the pre-made green tag. The other BOO I created with a stamp and colored it in with some pencils and then added glossy accents to give it some dimension. The Trick-or-Treat bag was another Jolee's creation that I added to a vellum tag.


The witch and broom were both pre-made (Jolee's I think) and I added the vellum tag. And then I added I pre-made spider to the spiderweb paper.


Next up, my Christmas Collage!

Here are the links to my other seasonal collages...

Fall

Friday, November 4, 2011

Etsy Finds 11.4.11


I hope you don't mind some Christmas Etsy Finds. Now that we're in November, I have Christmas on the brain!

1. But you said... - Classic movie preserved in a fun ornament. My husband and I exchange ornaments every year, and this one might have his name all over it.
2. Crepe Rosette Ornament - These have a pretty, vintage look to them and would be easy to make.
3. Personalized Photo Star Ornamanet - Baby's first ornament next year?
4. Tulle Wreath - Love this wreath!
5. Felt Sugar Cookie Ornaments - I want to make these. If I do, I will be sure to give a tutorial.
6. Gift Tags - I love to make my own gift tags. You could make these with a rubber stamp, or print the greeting onto some card stock with your computer and printer.

Christmas happens to be my MOST FAVORITE holiday, and I have lots of fun Christmas projects to share with you this month and next! I will try and dig out some decorations this weekend and post my first project next week.

This weekend my husband's three adorable aunts are throwing me a baby shower. My first shower of three, three weekends in a row. Baby Isabel is more loved than she knows!

Wishing you a fabulous weekend. xo

Jenny

Wednesday, November 2, 2011

Nursery Progress

The nursery is slowing taking shape! The glider arrived, and boy is it fancy. Not only does it glide, it also rocks and swivels. Now if only it could make me a mocha or latte, I would be even more impressed. The ottoman is still in transit,but should arrive before the baby.  I purchased a floor lamp at Target to go between the chair and crib, and covered the lampshade in some fun green polka dot fabric I had left over from my hoop project. I plan to dress up the bottom of the lampshade with some fun pom pom fringe.


Here's my hoops again. For the DIY go here.


The hubby requested a pillow for his lower back for the countless hours he will be spending in the chair with the baby.  And me being the good wife that I am, sewed him this fun pink pillow. I didn't tell him that I was planning to make a pillow anyway ;-)


The pom poms for above the chair arrived this week! I can't wait to assemble and hang them.

PartyPoms
 I also bought a cream pom pom to soften all the pink.

PartyPoms
I have been eyeing this fun rug for the nursery.

Urban Outfitters

I'm also eyeing something like this for curtains. If I can't find ruffle curtains in the right length I'm thinking I could get this shower curtain (or two) and make them into curtains.

Urban Outfitters

Next on the list of projects:

Create some frame art to go above the dresser.

Paint the changing table, that is after we dig it out of the closet!

Clean out the closet, which happens to currently house all my Christmas decorations.

Get the hubby to build me those book ledges for behind the door.

Make a ruffle lamp shade for lamp on dresser.

Finish it all before the baby arrives!

Nest! Nest! Nest!!

Jenny

Monday, October 31, 2011

Embroidery Hoops DIY

Who knew embroidery hoops, with some fun fabric, could be turned into wall art? I don't care if everyone else with a nursery has them hanging on their walls. I just love them so!


Most of you could probably figure out how to makes these if  you wanted to, but I'll give you my DIY anyway....

Supplies:

1. An assortment of wooden Embroidery Hoops from your local fabric, craft or thrift store. I used to be big on cross-stitching and had quite a few hoops collecting dust in the closet.

2. An assortment of colorful fabric.

3. Scissors.

4. Hot Glue Gun.


First off, let me just tell you to please ignore the string tied around the hoop. I was planning to use the string to hang the hoop to the wall, but the string needed to be higher, and I found a much easier way to hang the hoops. I never claimed to be perfect ;-)

Step 1. Take your hoop apart and place your fabric over the "inside" hoop. Next place the "outside" hoop on top  of the fabric over the "inside" hoop. Tighten the "outside" hoop.


Step 2. Trim the fabric approx.  a half an inch from the edge of the hoop, leaving enough length to glue the fabric to the inside of your hoop.


Step 3. Place a small amount of hot glue to the inside of your hoop and fold the fabric over, gluing the fabric to the inside of the hoop.


Step 4. Finish gluing your fabric all the way around.


Step 5. Voila! You now have a pretty fabric covered embroidery hoop. Continue steps for the remainder of your hoops.


I decided to used some scraps of fabric to create a monogram "I" for Isabel. I sewed each piece on with some embroidery thread. And then hand embroidered "I is for Isabel" in blue embroidery thread, although it's kinda hard to see in the photo.


And the finished project once again.  I'm really pleased with how they turned out.


Stay tuned for my next post later this week, where I will give you a sneak peak of the nursery progess and how the hoops look hanging above the crib.

Jenny
Related Posts Plugin for WordPress, Blogger...